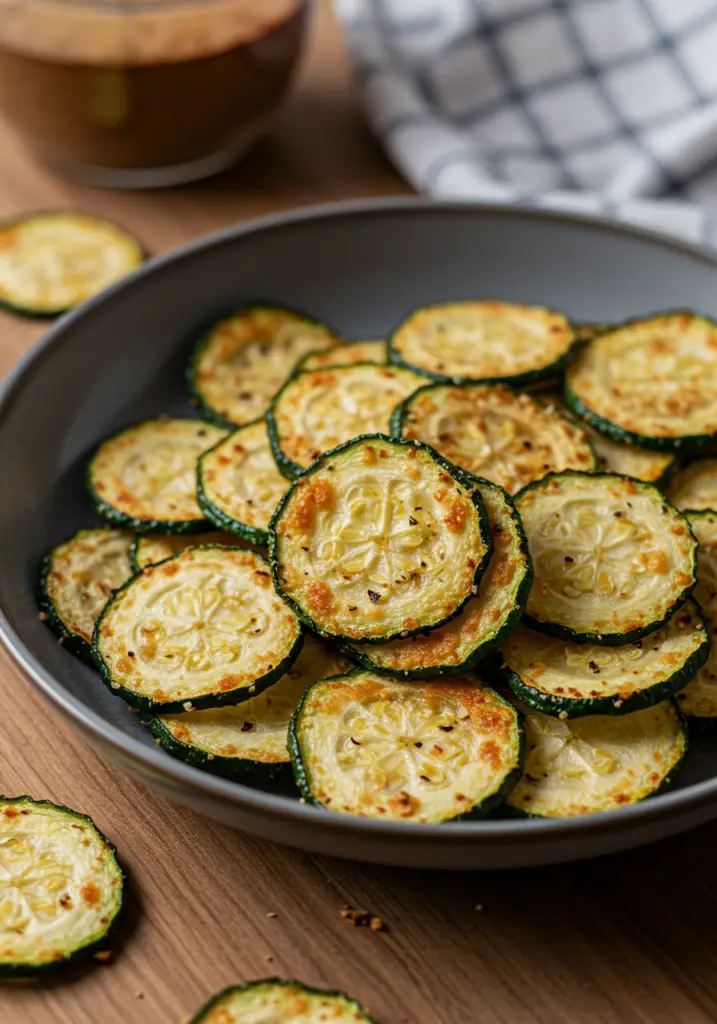
Looking for a guilt-free, crispy snack that satisfies your crunch cravings? These Crispy Baked Zucchini Chips are just what you need! Thinly sliced zucchini rounds are coated in a seasoned breadcrumb mixture and baked until golden brown and crisp. They’re perfect as a healthy appetizer, side dish, or snack—and you won’t even miss the fries.
Want recipes like this delivered straight to your inbox? Subscribe now to get the latest culinary creations you’ll love.
Why You’ll Love This Recipe
Healthy Crunch – Low in calories and full of fiber, but still totally crispy.
Baked, Not Fried – All the crisp, none of the grease.
Kid-Friendly – A sneaky way to enjoy more veggies.
Perfect for Dipping – Tastes great with ranch, marinara, or hummus.
Simple & Budget-Friendly – Made with just a handful of everyday ingredients.
Ingredients You’ll Need
For the Zucchini Chips:
- 2 medium zucchinis, sliced into thin rounds (about ⅛ inch thick)
- 1 tbsp olive oil
- ½ tsp salt
- ¼ tsp black pepper
- ½ tsp garlic powder
- ½ tsp smoked paprika (optional, for extra flavor)
For the Breading:
- ½ cup breadcrumbs (regular or panko for extra crunch)
- ¼ cup grated parmesan cheese (or dairy-free alternative)
- 1 tsp Italian seasoning
- Cooking spray or additional olive oil for misting
Tools You’ll Need
- Mandoline or sharp knife
- Mixing bowls
- Baking sheet
- Parchment paper or silicone baking mat
- Wire rack (optional, for extra crispiness)
Step-by-Step Instructions
Step 1: Preheat and Prep
Preheat your oven to 425°F (220°C).
Line a baking sheet with parchment paper or a silicone baking mat for easy cleanup.
If you have a wire rack, place it on top of the baking sheet for added airflow and crispiness.
Step 2: Slice the Zucchini
Using a mandoline or a sharp knife, slice zucchinis into thin, even rounds—about ⅛ inch thick.
Pat slices dry with paper towels to remove excess moisture. This helps them crisp up better.
Step 3: Season the Zucchini
In a large bowl, toss zucchini slices with olive oil, salt, pepper, garlic powder, and smoked paprika. Make sure each slice is well-coated.
Step 4: Bread the Slices
In another bowl, combine breadcrumbs, parmesan cheese, and Italian seasoning.
One by one, press each zucchini slice into the breadcrumb mixture to coat both sides.
Place coated slices in a single layer on the prepared baking sheet or wire rack.
Step 5: Bake Until Crispy
Lightly mist the zucchini chips with cooking spray or drizzle with a bit of olive oil.
Bake for 20–25 minutes, flipping once halfway through, until golden brown and crisp.
Keep a close eye near the end to prevent burning—thinner slices may cook faster.
Step 6: Serve & Enjoy
Remove from oven and let cool slightly.
Serve warm with your favorite dip or enjoy on their own for a crunchy snack.
Tips for Extra Crispy Zucchini Chips
Slice Evenly – Uniform slices ensure even baking and prevent soggy spots.
Use Panko – For extra crunch, panko breadcrumbs work better than regular.
Don’t Overcrowd – Give each chip space so they crisp instead of steam.
Use a Rack – A wire rack allows air to circulate under the chips.
Let Them Rest – Cool for a few minutes after baking to help them crisp further.
Serving Suggestions
Dips – Serve with ranch, marinara, tzatziki, or spicy aioli.
Appetizer Platter – Pair with other baked snacks like sweet potato fries or cauliflower bites.
Side Dish – A healthier side to sandwiches, burgers, or grilled chicken.
Salad Topper – Add crunch to your salads instead of croutons.
How to Store & Reheat
Storing:
Store in an airtight container at room temperature for up to 2 days.
For best results, eat the same day—they’re crispiest fresh from the oven.
Reheating:
Oven or toaster oven: Reheat at 375°F for 5–7 minutes to restore crispness.
Avoid microwaving—they’ll turn soggy.
Frequently Asked Questions
1. Can I make these gluten-free?
Yes! Use gluten-free breadcrumbs or crushed gluten-free crackers.
2. Can I make them vegan?
Absolutely. Skip the cheese or use a plant-based parmesan alternative.
3. Why are my chips soggy?
Too much moisture or overcrowding can prevent crisping. Pat zucchini dry and bake in a single layer.
4. Can I air fry them?
Yes! Air fry at 400°F for 8–10 minutes, flipping halfway, until golden and crisp.
5. Can I prep these ahead of time?
You can slice and season the zucchini ahead, but bread and bake right before serving for best texture.
Final Thoughts
Crispy Baked Zucchini Chips are the ultimate healthy snack—light, flavorful, and satisfying without the guilt. They’re easy to make and so versatile, whether you’re looking for a snack, appetizer, or side. Bake up a batch today and discover how delicious healthy eating can be!
Let me know how yours turn out and don’t forget to tag your homemade chips with your favorite dips!
Preparation Time: 10 minutes
Cooking Time: 25 minutes
Cuisine: American
Nutritional Information (Per Serving):
Calories: 140 | Protein: 4g | Carbohydrates: 14g | Fat: 8g | Fiber: 2g | Sodium: 270mg

Crispy Baked Zucchini Chips
- Prep Time: 10 minutes
- Cook Time: 25 minutes
- Total Time: 35 minutes
- Cuisine: American
Description
Looking for a guilt-free, crispy snack that satisfies your crunch cravings? These Crispy Baked Zucchini Chips are just what you need! Thinly sliced zucchini rounds are coated in a seasoned breadcrumb mixture and baked until golden brown and crisp. They’re perfect as a healthy appetizer, side dish, or snack—and you won’t even miss the fries.
Want recipes like this delivered straight to your inbox? Subscribe now to get the latest culinary creations you’ll love.
Ingredients
For the Zucchini Chips:
-
2 medium zucchinis, sliced into thin rounds (about ⅛ inch thick)
-
1 tbsp olive oil
-
½ tsp salt
-
¼ tsp black pepper
-
½ tsp garlic powder
-
½ tsp smoked paprika (optional, for extra flavor)
For the Breading:
-
½ cup breadcrumbs (regular or panko for extra crunch)
-
¼ cup grated parmesan cheese (or dairy-free alternative)
-
1 tsp Italian seasoning
-
Cooking spray or additional olive oil for misting
Instructions
Step 1: Preheat and Prep
Preheat your oven to 425°F (220°C).
Line a baking sheet with parchment paper or a silicone baking mat for easy cleanup.
If you have a wire rack, place it on top of the baking sheet for added airflow and crispiness.
Step 2: Slice the Zucchini
Using a mandoline or a sharp knife, slice zucchinis into thin, even rounds—about ⅛ inch thick.
Pat slices dry with paper towels to remove excess moisture. This helps them crisp up better.
Step 3: Season the Zucchini
In a large bowl, toss zucchini slices with olive oil, salt, pepper, garlic powder, and smoked paprika. Make sure each slice is well-coated.
Step 4: Bread the Slices
In another bowl, combine breadcrumbs, parmesan cheese, and Italian seasoning.
One by one, press each zucchini slice into the breadcrumb mixture to coat both sides.
Place coated slices in a single layer on the prepared baking sheet or wire rack.
Step 5: Bake Until Crispy
Lightly mist the zucchini chips with cooking spray or drizzle with a bit of olive oil.
Bake for 20–25 minutes, flipping once halfway through, until golden brown and crisp.
Keep a close eye near the end to prevent burning—thinner slices may cook faster.
Step 6: Serve & Enjoy
Remove from oven and let cool slightly.
Serve warm with your favorite dip or enjoy on their own for a crunchy snack.
Notes
Slice Evenly – Uniform slices ensure even baking and prevent soggy spots.
Use Panko – For extra crunch, panko breadcrumbs work better than regular.
Don’t Overcrowd – Give each chip space so they crisp instead of steam.
Use a Rack – A wire rack allows air to circulate under the chips.
Let Them Rest – Cool for a few minutes after baking to help them crisp further.